
Usually the Sudoku author provides clues in the original Sudoku that prevent the existence of “singularities“. When the author does not provide a clue, the “avoidable rectangle” or “singularity” must be avoided, as it will lead to a Sudoku with two solutions or no solution at all.
Straight to an example. The Single Rectangle or Avoidable Rectangle are the four cells marked in yellow, all with only the same two candidates (four bi-valued cells, with the same candidates, in only two boxes).
Explaining better, watch the sudoku below. The author, in the original Sudoku, set the clues in bold, especially the numbers “8” and “9” (in cells A4 and A7), so that the Sudoku had only one solution. Numbers in italics were discovered while solving sudoku. Reverse their positions and you have another valid Sudoku. Reinforcing, this Sudoku has only one solution because the author fixed the numbers “8” and “9”. If the numbers “8” and “9” in cells A4 and A7 had been solved by the reader (and not fixed by the author) Sudoku would have two solutions.

If the author of the sudoku had not given the numbers “8” and “9” (cells A4 and A7) as clues, the sudoku would have the two solutions below, being a sudoku of poor quality (which are rare in good publications) and could not have a solution or some techniques could lead to errors.
The technique uses only two boxes.
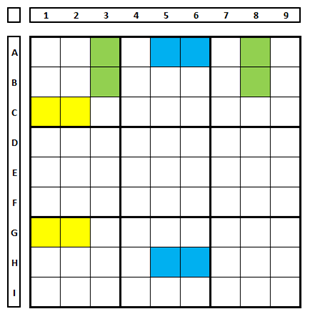
Boxes do not need to be contiguous, but only two boxes can be used. In the model below, the cells in yellow, blue or green are examples of where the existence of singularity can be verified.
Demonstrating deception using four boxes.
In the example below using four boxes (2, 3, 5 e 6) apparently the number “4” would be necessarily in B9, but this is not correct, the solution for this cell is the number “5”.
Below Sudoku solved. The 8/5 inversion does not bring a second sudoku, since the Sudoku on the right is invalid (two numbers “8” in box 5). Demonstrated why in this technique only two boxes should be used.

Tip: this technique only works for well-constructed Sudokus, with only one solution, but this is the case for almost all Sudokus published in magazines and newspapers, so don’t worry and use the technique, which solves many Sudokus with medium difficulty.
Reread the concepts above to understand the technique well, as it shows solutions in many cells of various sudoku puzzles.
Avoidable rectangle example 1:
In the Sudoku below, the bold numbers form the original Sudoku, “clues” given by the author. The numbers in italics/non-bold were discovered during the solution of the Sudoku.
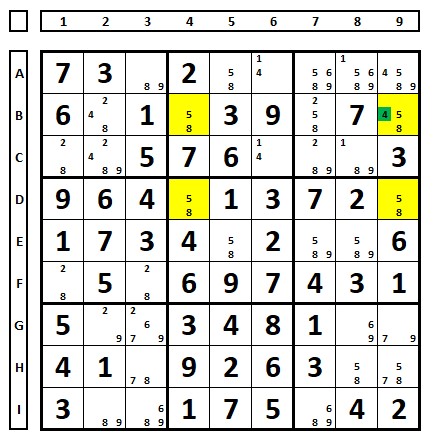
The positions in yellow show an avoidable rectangle – without the use of clues, because if the number “5” in E7 were part of the solution, we would have a Sudoku with two solutions, so the number “5” in E7 can be excluded.
To explain further, when the Sudoku is solved with the number “5” in E7, the Sudoku would have two solutions (the numbers “9” and “5” could occupy each other’s position, generating another Sudoku). Since high-quality Sudokus should have only one solution, the number “5” in E7 should be excluded.
Note that two more techniques are eliminating the number “5” in E7. The first one is the number “5” in D7. The second is that the numbers “1” and “3” only occupy the cells D7 and E7 in box 6, so the other candidates in these cells can be excluded.
Avoidable rectangle example 2:
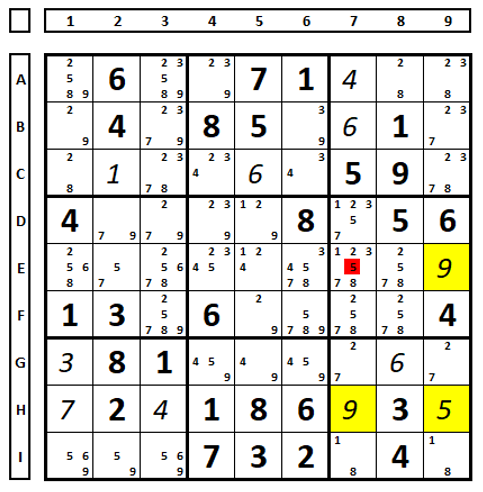
If there is only one cell in the rectangle that contains extra candidates, the common candidates can be eliminated from that cell. In the case below, the number “7” will be the solution in H7.
Avoidable rectangle example 3:
In the row or column of the rectangle, there is the same extra number that is not present in the other row/column. This number can be excluded from the cell that sees both numbers. It is not known at this time which of the numbers “9” will be the solution (A2 or A3) but one will be to avoid singularity.

In the Sudoku below, there is a possibility of singularity in the cells marked in yellow. In cells E5 and E6, the number “9” will be the solution in one of the cells, which prevents the number “3” from being the solution in any of these cells. Therefore, the candidate “3” in cell E4 is part of the solution to this Sudoku.

Avoidable rectangle example 4:
A rectangle formed by two cells containing only two possible numbers (A and B) in a row/column. In the other row/column, there are extra numbers, but one of the two numbers (A or B) that make up the rectangle is unique to that row/column, and the other number in the rectangle can be excluded.
In the example below, there will be two exclusions. The number “2” is only present in the cells marked in yellow in column 4 and will be the solution in one of these cells. In this case, to avoid singularity, the number “8” must be excluded from both cells.

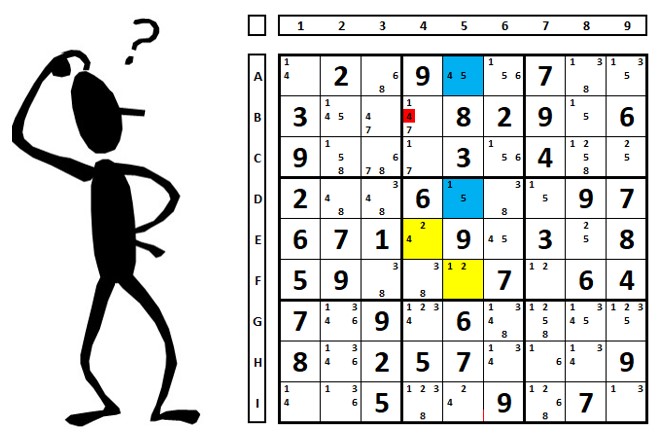
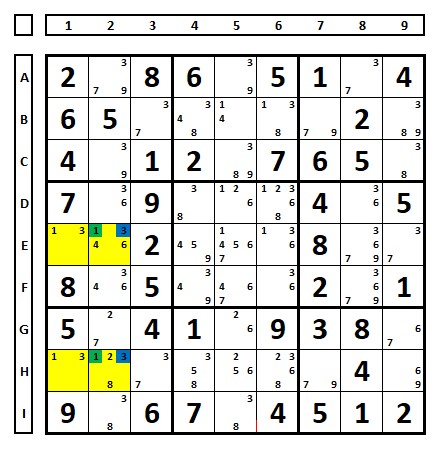
In the Sudoku below, any choice made for the number “3” in E2 or H2 forces the number “1”, therefore, the blue “3” numbers must be excluded to avoid singularity.
Avoidable rectangle example 5:
This one requires some thinking! Observing the example below, there is a possibility of singularity in the cells marked in yellow (7,3). If this occurs (the four cells with these two candidates), there would be singularity.
Note that if the solution in cells A8 and A9 is (5 and 8), regardless of which cell they are in, the eliminations in red will occur, creating singularity.

Therefore, the solution in A8 or A9 will be the number “3”, without knowing which one, but it allows the following conclusions:

Avoidable rectangle example 6:
This is a uniqueness test that uses two cells in the same box (on the same row or column) with two candidates, that is, a Naked Pair. In another box, there are the same two candidates with extra candidates.
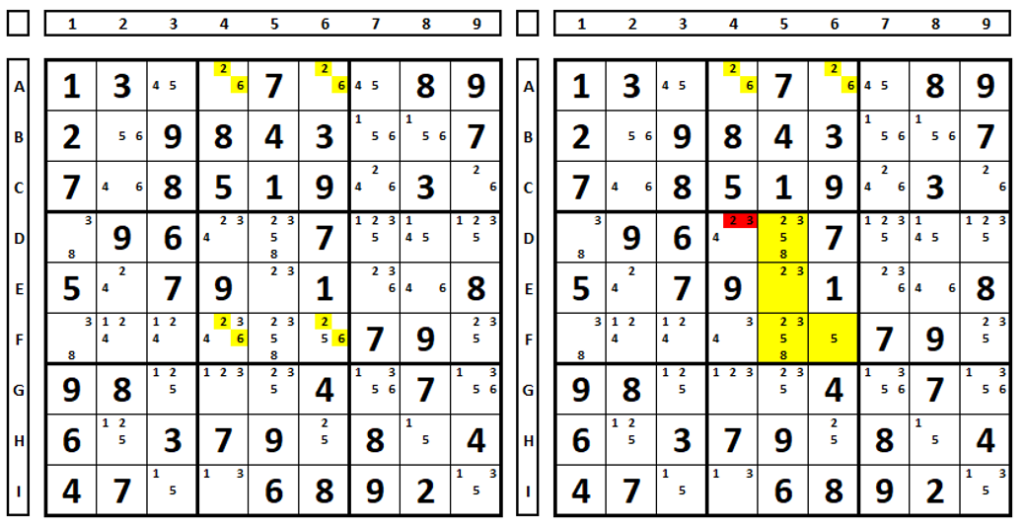
To go straight to an example, in the Sudoku below, there is a Naked Pair in cells E4 and E5, and the possibility of forming uniqueness with cells H4 and H5. The technique consists of temporarily “deleting” candidates numbers “2” and “4” from cells H4 and H5 and seeing if a Naked Pair, Naked Triple, or Naked Quads is formed in that box

Making the temporary elimination of numbers “2” and “4” in H4 and H5 below, a Naked Pair is formed in the cells marked in yellow (the numbers “1” and “3”, two numbers in two cells), within the same box. Therefore, the candidates in red, within the box, can be eliminated (don’t forget, in the Sudoku above).

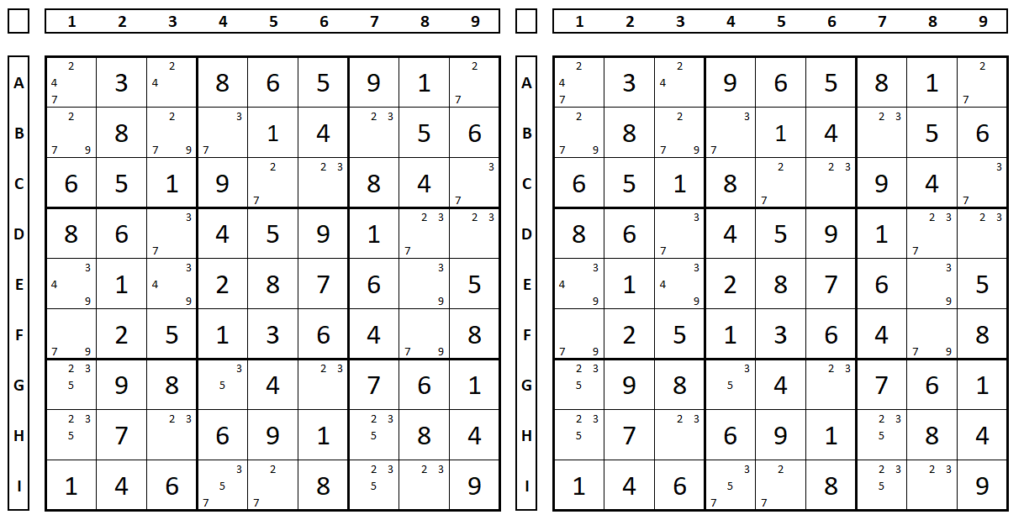
Another example. In the left Sudoku, there is a possibility of singularity in the cells marked in yellow. A test was performed on the right Sudoku, with the temporary elimination of numbers “2” and “6” from cells F4 and F6, forming a Naked Quads in the cells marked in yellow (4 cells, 4 numbers, in the same box). With this, we can eliminate the numbers “2” and “3” (which are part of the Naked Quads) from cell D5, which does not belong to the Naked Quads. Remember, never eliminate a number that is part of singularity (i.e., the numbers “2” and “3” in cells F4 and F6 in this case) and the elimination is in the original Sudoku (in this case, the one on the left).
The technique does not work when there is a possibility of having two or three Naked solutions in the box. Examining an example. In the Sudoku on the left, there is a possibility of singularity in the cells marked in yellow (numbers 1 and 9). When we mirror it to the right and eliminate the numbers “1” and “9” in cells A1 and C1, we have two Naked Pairs (A1/A2 and A1/C1), in addition to a Naked Triple (A1/A2 and C1). Using the technique, apparently all the “9” numbers in cells B3/C2/C3 would be excluded, but this number is a solution in cell B3.

Avoidable Rectangle Example 7:
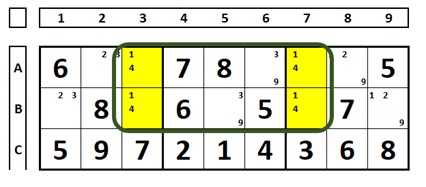
Also called Unique Hidden Rectangle or Unique Hidden Quad. Going straight to the example. This type of singularity occurs when the rectangle (in yellow) has two extra candidates (in this case the number “8” in cell C7 and “3” in cell F8). The condition is that the other number (the “7” in the example) only occurs within the rectangle that forms the singularity. Note that the number “7” forms an X-Wing, solving one will lead to the solution of the others. If the two “7” numbers in the sets containing the extra candidates were chosen, the singularity would be formed (test it), which is why both should be excluded.

Avoidable Rectangle example 8:
It requires a rectangle with two or three cells with additional candidates. Look at the bi-value cell and check the opposite corner of the rectangle. If a candidate of the singularity does not see any other except inside the rectangle, the opposite number can be excluded.
Or, it occurs when the numbers in a rectangle see extra candidates outside the rectangle, except for one. If one of the component numbers of the rectangle (A and B) can only exist in a row and column of the rectangle, the other number of the rectangle (A or B) can be excluded from this cell. In the example below, the number “6”. Cell H7 sees the opposite cell F8. The number “6” in cell F8 only sees other “6” inside the avoidable rectangle. Therefore, the number “1” can be excluded in F8.

Examine this example:

Avoidable Rectangle example 9:
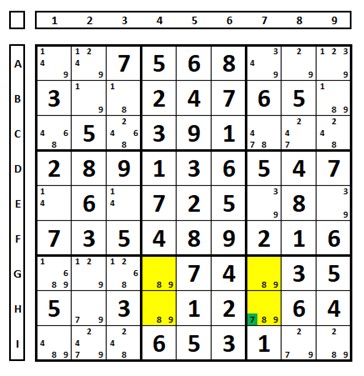
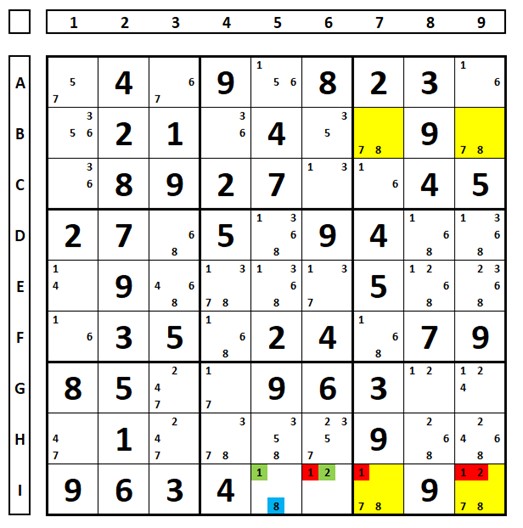
In the example below, if the number “1” in cell I5 were the solution, a singularity would be created in the yellow cells. In this case, the solution is the blue marked number “8” in the same cell.
Avoidable Rectangle with missing candidate
In the example below, the number “2” is missing from cell B8. But if the number “2” is chosen in cell B7, the deadly pattern is created. Therefore, this number can be excluded from cell B7. The number “4” forms an X-Wing in the yellow cells.


Another example:
In cell B7, there is no “4” to form the deadly pattern. But by choosing the number “1” in cell B7, the deadly pattern is formed, so it can be excluded.

Note:
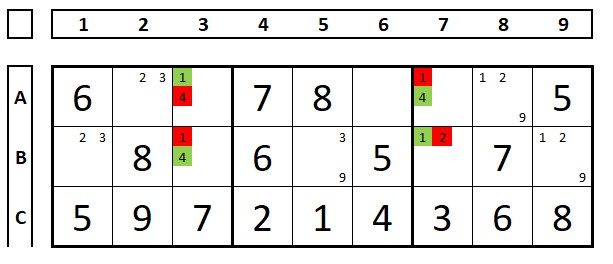
There are other situations where this technique can be used, the given examples are sufficient for the reader to observe similar situations. One more example to conclude this technique, in the example below there must be either a “3” or a “4” in B1 or C1. As both numbers are present in B2, the numbers “3” and “4” can be excluded from the other cells in this box.