Home Contact Privacy-Policy

X-Wing

It always occurs when there is a possibility of having, in two rows or two columns, conjugate pairs of numbers in the same row/column crossing.

These pairs are also called “locked pairs“, as the solution to one leads to the solution of all.

In the Sudoku below, the number “6” can be present as a candidate in any of the white and green cells. It cannot be present in the cells marked in yellow due to the position of the clues (A9, G6, and H3). Note that for any solution in B2 or B4, the solution will be inverse (in “x”, hence the name of the technique) in D2 and D4. With this, those marked in red can be excluded:

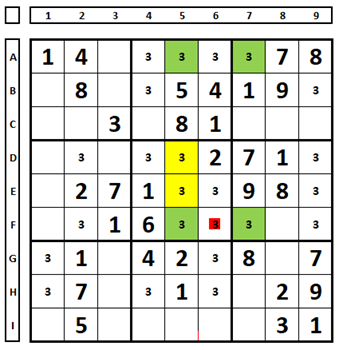
Note the “false” X-Wing below. There is a row with an alternating pair (number “3” in row G), supported by two columns with two alternating pairs (columns 3 and 7). Any choice made for this number in column 7 will exclude this number from cell A1. It could be a column supported by two rows. Some authors give other names for this situation, such as Skyscraper or Arachnid, a technique described below:

Below are techniques that explore situations similar to X-Wing.

Finned and Filleted X-Wings:

Example 1.

When examining the Sudoku below, the number “3” forms a false X-Wing (green cells). False because there are locked pairs in column 7, but not in column 5. Examine the consequences of choosing A7 or F7 as the location for the solution for the number “3”. In box 5, either the number “3” is the solution in the green cell or in one of the two yellow cells, so the number “3” in cell F6 can be excluded:

Example 2.

In the example below, there are two “1”s in column 3 and two “1”s in column 4 forming an alternating pair, and one more “1” (in brown). One of the “1”s in column 3 is the solution. However, in column 4, one of the two blue “1”s will be part of the solution or the brown “1” will be part of the solution. Therefore, the “1” in cell C5 can be excluded, as for any choice made in column 3, the “1” in cell C5 will be excluded.

The colors used here are for demonstration purposes of this technique and are not part of the coloring technique:

Example 3.

The number “7” in cell E9 can be excluded, as it will be false for any of the chosen “7” numbers in row 1. Note that the number “7” in cell E7 cannot be excluded. (If this number is a solution in cell D4, it will be a solution in cell E7):

Example 4.

In the Sudoku below, there is a pair for the number “6” in the H row (H5 and H9). We can form a pair in the E row (E5 and E9). The cells marked in yellow can also be a solution for the Sudoku. For any choice made in the H row, the number “6” in the cell F5 can be excluded:

Example 5.

Choosing the number “5” in cell D4 would leave row F without a solution, so it can be excluded. Therefore, one of the numbers “5” in row D of QM6 (D7, D8, or D9) will be the solution. Thus, this number in cell E7 can be excluded.

Since the number “5” is a solution in cell F6, this number can be excluded in cell H6, being a solution in cell G4. The consequences are that this number in cell G7 can be excluded, is a solution in cell I9, and a solution in cell D7.

Good training, take this Sudoku and consider each of the four possibilities in row D (one by one) as correct:

Example 6.

The number “1” can only occupy two cells in row A. Note that for any correct choice made in row A, the number “1” in cell E5 can be excluded. The Sudoku below is for demonstration purposes only, as the number “1” only occupies one cell in row F, and would also exclude the number “1” from cell E5. It is common for several techniques to reach the same conclusion, and it could not be otherwise since the Sudoku must have only one solution:

Example 7.

Exercise your mind. The number “7” in E5 is the solution in this cell: